
Introduction
 After over 2 years of design, development and testing, Vaporfections’ miVape is finally available and it offers users, a pocket sized version of their flag-ship desktop vape, the viVape.
The miVape promises to be one of the most technologically advanced vaporizers on the market, with the cleanest and clearest vapor ever, thanks to it’s mostly all glass air path and true, convection heat. CLEAN TASTE, CLEAR CHOICE!
Features and Specifications
- Quartz crystal glass components: airway, heating system, heating chamber, herb/wax Cups and draw stem.
- Pocket sized, portable design
- Medical-grade materials
- True convection heating and conduction
- Compatible with dry herbs and concentrates

- Fully adjustable digital temperature control system (5°F increments)
- Temperature range: 250°F – 430°F
- OLED display
- Fast heat up: about a minute or less
- Rechargeable and user replaceable battery: custom lithium-ion polarized battery
- Great battery life
- Auto shut-off: set by user from 4-10 minutes
- Dimensions: 2.5 x 4 x 1.25 inches
- Weight: approx. 154 grams
- Unique spiral quartz crystal glass heat engine/air path
- Removable glass chambers ( Cups )
Design and Construction
-Overview

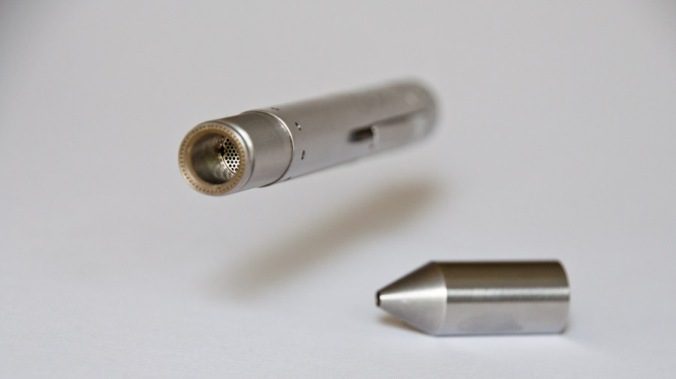
miVape Includes: 2 Quartz Cups, 2 Silicone Safety Cups w/ Silicone Lids, Brush, 10 Waxy/Oil Cloths, Pick (built in on miVape body), 3 Spare Screens, Wall Charger (not shown), User Guide (not shown)
After watching and waiting for the miVape for quite some time, I had high hopes for this device, given the amount of time it was in development and considering all of the delays.
I had expected and hoped for some metal in the design and body of the device but when I received mine on that fateful day, I was somewhat disappointed. First of all, no metal anywhere, besides the mouthpiece screen. Upon picking the miVape up for the first time, it felt more like a toy than a device I should be inhaling vapor through and a bit concerning at first. I don’t expect vaporizers to be 100% medical grade but most people switch from smoking for the health benefits and a lot vaper’s are medical users, so vaporizers should at least be built with this in mind and built to a higher standard. Even though the miVape is constructed with purity in mind and features lot of glass components, which is a great, pure and inert material, I worry about the rest of the device itself and what it’s made out of. I think the idea behind the miVape is great and this device is capable of producing very pure, clean vapor but I only wish that they had taken their design further and used higher quality materials in the body / mouthpiece in order to take advantage of the full capabilities of that glass convection heating system.
-Body
Sadly, the miVape is e ntirely plastic, excluding the quartz glass air path, glass Cups and glass draw stem. I understand that you can’t always use metal to build vaporizers for obvious heat reasons but it seems like Vaporfection could have used some in their design to make it feel more luxurious, reliable and less flimsy. A metal lid, metal sides and / or a metal battery door / latch would have done wonders to make this vape feel better. Companies have pulled off all plastic bodies before, like the Crafty and Mighty by Storz and Bickel, which are two amazing portable vaporizer’s and they still feel high quality and safe, not to mention the awesome vapor they produce. The plastic of the miVape isn’t overly solid either, it creeks and moving parts could easily break if your not careful, especially the lid and the battery door which are flimsy and loose. It also appears that some of the plastic is painted silver, which kind of worries me for obvious health reasons but at least most of the silver parts are on the outside of the device. Vaporizers don’t need to be bullet proof but they should be built with health in mind from quality, safe materials, after all, people will be inhaling heated vapors through them and I feel that Vaporfection could have done a better job constructing the miVape. The construction and materials of the miVape body is my #2 major negative of the device and it just seems like they should have built it slightly better, given all the fragile, sophisticated glass and special heat engine inside. However, I will say that after placing a battery in the unit, the miVape felt much better, it stiffened up a bit, it was less creaky and had a nicer feel and heft to it.
The very first miVape’s had a few issues from floppy lids, batteries that got stuck and  temperatures that weren’t calibrated correctly, so they ran hot, about 100°F too hot. I think It’s important to mention the first miVapes because it shows that Vaporfection listens, that they stand behind their device and that they want to deliver a good product. As soon as Vaporfection got wind of the issues, they worked extremely hard to fix all the issues and eventually sent out replacement units. I have to give it to Vaporfection and especially Dan, for providing excellent customer service and for standing behind their product. I am a Vaporfection customer for life, even though I may not be 100% sold on the miVape. I Hate to be so critical towards the miVape but this is only my opinion and I am just trying to cover everything I can and as honestly as I can.
After awhile, the replacement miVapes arrived and I received mine directly from Vaporfection. I was expecting to see some major changes to the unit after reading about the upgrades in a newsletter sent out from Vaporfection but the replacements looked and felt the same, however, the new units were re-calibrated, so the temperatures are more accurate, they also supposedly beefed up the battery door and / or latch, cleaned up the battery compartment more for easier battery change out, changed the logo on the sides so the new ones are now recessed and they made the lid slightly stiffer and that was basically it. Also, the miVapes now come shrink wrapped and sealed for authenticity.
-Heater
 The heater design of the miVape is definitely special. It’s unique, unlike any other portable vaporizer, which mostly all feature metal or ceramic heaters but the miVape is the first portable to have a glass air heating system, combined with a mostly glass vapor / air path. You can compare this device’s heating system to the VapeExhale Cloud Evo and Vaporfection’s own, viVape desktop, which both feature all glass heating systems, except on a larger scale. Glass is what most people prefer when it comes to flavor and purity, so when I first got wind of the miVape and saw the design, I was blown away and I just couldn’t wait! Again, I love the idea behind the miVape, a portable vaporizer featuring a glass vapor / air path with a glass convection heating system and glass material Cups, so you can only imagine the purest, cleanest, fullest flavored vapor production, given how inert glass is, so it’s a flavor chasers dream rig but I felt like the execution / construction of the miVape missed the mark.
GLASS, GLASS AND MORE GLASS. Except for a few areas, the miVape features an all glass air and vapor path, minus a small section of Silicone where the air enters the glass tube, a small Silicone seal around the top of the glass chamber and a section in the mouthpiece that joins the glass Cup with the glass draw stem. The DaVinci Ascent was the first portable vaporizer with a glass vapor path but it utilizes a conduction ceramic heater, whereas the miV

miVape “True Convection” heat system. (vaporfection.com)
ape uses “True Convection” and I will touch on this more in the Vaporization section. This glass heater works by pulling fresh air in through the bottom of the unit through some small holes around the USB Port, which then enter a short section of Silicone tube that connects to the glass heater area where this glass tube makes a spiral and ends at the glass chamber where the glass material Cup sits suspended inside. The actual heat is produced from a small metal coil that is wrapped around a section of the glass tube, just above the spiral and below the chamber. This coil heats the glass, which then heats the air as it passes through the heated glass tube and spiral, then into the chamber and finally heats the material in the glass Cup. The miVape offers “True Convection” heat but there is also some conduction heat going on as well and this can be confirmed by leaving a loaded Cup inside the heated unit without inhaling and after a while, the material will be partially vaporized. Conduction isn’t necessarily a bad thing but in this case, it makes it more difficult to get good, consistent results with dry herbs but on the other hand, it actually is a plus when using concentrates. I think the conduction happens as a by product of their convection heating design or perhaps they wanted the conduction as well but the glass Cup sits so close to the glass walls inside the chamber and so close to the metal coil heater, the glass Cup inevitably conducts heat via conduction in addition to the convection hot air you pull through the glass spiral. This extra heat centered mostly around the bottom of the Cup brings me to my #1 negative of the miVape, I simply have a hard time getting consistent, even heating and without charring or burning the material when I’m using dry herbs. I think if they enlarged the chamber, changed the design of the Cups and / or moved / re-designed the coil, would potentially solve the issue of uneven heat and make a huge difference but as it is now, you can still get good results if you do things a certain way.

Inside the miVape, showing the glass tube/spiral heat engine. (vaporfection.com)
-Chamber / Mouthpiece
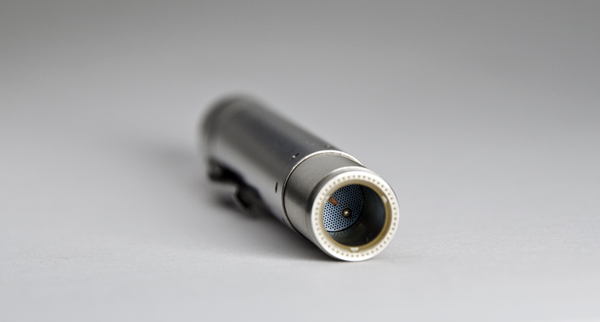
The mi Vape features a removable material chamber or Cup. These Cups are Quartz glass like the rest of the glass components and they can be used with dry herbs or concentrates, either by using the included wax cloths or on their own, if they are a drier consistency so it won’t drip through the holes and into the chamber / heater. These Cups feature 3 holes in the bottom for the air flow but when you look at them, its hard to believe that they designed these Cups with convection heat in mind, given that the holes are so small and theres on 3 of them, so how much convection heat is really happening? These 3 small holes can also allow debris to fall through into the chamber, so that’s something to be aware of and check for after a session so they don’t build up or fall into the heater where it could potentially restrict the draw even more and cause the vapor to taste off. The Quartz Cups have a rim that is there to hold them in place on the mouthpiece assembly, where they slide onto a track and kind of snap into place when they are positioned directly below the Stainless Steel screen of this mouthpiece assembly. I have noticed that its not a perfect seal where the glass rim meets the plastic, so some extra fresh air is being pulled in from that area, in addition to the holes in the Cup where the hot air enters, which makes me wonder if the device would work better if it was a tighter seal so more hot air could be pulled through instead of cold air from the outside that doesn’t aid in the vaporization process. Each pair of Cups also come with Silicone Caps that securely seal these Cups, so you can pre-pack them for on the go convenience and they also come with Silicone Safety Cups for cool handling of the Cups when they are still hot. I enjoy using the Cups but I wish they featured a flat bottom with an option for a screen, so it could potentially help the air-flow and convection heat, as well as keep the chamber cleaner. I would also like to see a Cup with Holes located half way up, on the sides or something, so you could use concentrates without having to worry about them dripping through the bottom but luckily I haven’t had an issue with this yet.
 The actual mouthpiece assembly is another story entirely and brings me to my #3 negative of the miVape, you cannot take this piece apart to clean it and you can’t get it fully clean without taking it apart! This mouthpiece just doesn’t make much sense, given that Vaporfection was going for an all glass design, so they tossed in this plastic nightmare, which basically defeats the purpose of the glass system but at least the glass is used in most of the important places. I’m not so concerned that this piece is made out of plastic but that it cannot be broken down for cleaning, except for removing the screen which does little to help in this process. Although, I do like how the mouthpiece works with the rotating draw stem, which is really nice and I like using it, it’s very comfortable and it never gets hot but when if comes time for cleaning, it’s pretty much impossible to get it completely clean because of all the nooks and crannies for residue to hide and build, as well as the fact that if you try soaking it in alcohol for any period, you risk the orange paint washing off and the black plastic turning white. The “Clean Taste, Clear Choice,” just goes d
 own the drain when you can’t properly clean a mouthpiece, so no matter how capable the miVape is at producing pure, clean vapor, it just gets mucked up when you have a dirty mouthpiece, which is the main piece that will get dirty! At nearly $20 each for a replacement mouthpiece, it just doesn’t make sense to buy one every time they get dirty so you just have to work at it if you want to get it clean again and its not easy.
There is a rumor of an all glass mouthpiece in the works and if so that will be huge! I will keep this review updated, if and when the new mouthpiece happens!
– Battery
 This vaporizer has really good battery life, along with the ability to change / replace the battery, means you always have plenty of power to spare and you have the option to bring back-ups for extended outings. The miVape uses a custom Li-Ion battery with a capacity of 3100mAh. Spare batteries are not particularly cheap though, at $39.99 they set you back a little but its not terribly unreasonable and its always nice to have spares, plus all batteries eventually loose capacity, so even having the option to replace a battery is a huge plus and I think EVERY PORTABLE VAPORIZER SHOULD HAVE A REPLACEABLE BATTERY! On average, I am able to get between 8-12 sessions at 350°F, lasting 6 minutes each which is really good in my book however, you can’t use the device while its charging.
Charging the miVape is easy as plugging it in and you will see the LCD turn on, showing “Charging” and the current charge percentage. The USB cable can be a little difficult to push into the charging port of the miVape, so you just have to make sure its in far enough. Sometimes during charging, my unit likes to get stuck on 80% or 90%, and then it stays there for a lot longer, then eventually it reaches the “Fully Charged” status. I would like to see a charging dock so you can have the option to charge your spares instead of having to put them into the device each time.
Also, the battery can be tricky to get in and out, so it usually requires a slight bump on the bottom to get it started and coming out so I can pull it the rest of the way but there is a
spring inside the battery compartment that helps.
The battery latch and door are a bit flimsy and I wonder how long it will last with repeated use but so far no problems. This is an area I would have really liked to see some metal used in place of the plastic for strength and reliability, after all, this mechanism is something that will be used often by most and without it, the miVape will be useless unless you fashion a way to hold the battery in place. One other note, the knob that you slide to open / lock this door, slightly protrudes out, so the unit is a little wobbly when standing up and I’ve tipped it over repeatedly but luckily I haven’t broken anything.
Vaporization
-Operation / Usage
The miVape is easy to operate but it’s not always easy to get good results, that’s the catch…. Basically just fill your Cup, LOOSELY with dry, medium to finely ground herb, no more than 3/4 full, slide the Cup into the mouthpiece assembly, line up the orange arrows and gently push it into place until the latch locks it into place. Turn the miVape on and set your temperature and I recommend starting at 340F, wait for it to get to temp and about a minute after it reaches your desired temperature, you should get visible vapor but you will definitely get  some great taste before you see any vapor. I will sometimes turn mine down after a few minutes because it does get hotter after a while, so give it a little time before turning it up more. This vape defiantly heats up quickly but it takes a little while longer after the temperature has been reached to start producing visible vapor, in part because I think it takes a little while for all the glass to reach the same temperature as the coil for the convection heat. I have seem some people who wait for their unit to reach their set temperature before placing the glass Cup / mouthpiece assembly into the miVape but I have found that you get vapor faster by leaving the glass Cup inside the unit while it heats up.
It can be a little difficult to push the Cup and mouthpiece assembly into the miVape body because there is a Silicone seal that surrounds the Cup around the rim of the chamber, so I found that it works best to always have the release / lock button pressed when loading and removing this assembly piece. Just line up the orange arrows and that’s really it, it can’t go in the other direction. The release button could be better, it sticks at times and the locking tab doesn’t always fully retract, so if you can’t pull the mouthpiece assembly out smoothly, so make sure the locking tab is fully retracted and you shouldn’t have too much of a problem. Also, the lid can easily break! Use caution when opening and closing the lid and be aware of it as you load the device.
The miVape features and both Celsius and Fahrenheit, which can be selected by pressing the power button once while the unit is on and to change it, just hit either the “Plus” or “Minus” buttons to make your selection. The OLED screen shows your set temperature but it would have been nice if it showed the actual temperature as well because I feel like it changes during the session and gets hotter, although I don’t think that the miVape actually measures the temperature at all, I think it’s calibrated during production to reach a certain level based on your selection. Every time you start the miVape, it starts at 0°F then jumps to 42°F and then slowly climbs to your set temperature and after that, its never changes. Compare that to the Crafty and Mighty vaporizers that actually measure / regulate the temperature during the entire session, so when you start either device, the device / temperature starts out at whatever the outside temperature is, so if it’s 80°F outside then the Crafty or Mighty will start at 80°F and climb until it reaches your set temperature. From there, both of those units regulate the temperature to stay within a small given range of the set temperature and adjusts itself depending on the outside temperature, your draw speed and duration etc. I guess it  doesn’t really matter that the miVape may not measure the actual temperature, as long as your getting good results but vaporizing is a dependent on a lot of things and these devices are capable of producing many different results and effects based on specific temperatures, so I prefer to know exactly what temperature I am vaping at, that way I can repeat the exact same results next time.
The miVape also features and adjustable shut-off timer from 2-10 minutes that can be changed by pressing the power button once more after the Celsius and Fahrenheit screen and it takes you to the shut-off timer, where you can use the “Plus” or “Minus” again to select your time. I prefer the 6 minute shut off time and I found like that was usually enough time to fully vapotize a Cup. I would also prefer to see the actual shut-off timer indicated on the screen at all times, that way you know how much longer you have, instead of the last 10 seconds of the session, when the units counts down before shutting off but you can at least hit the power button to cancel the shut-off and keep going if you want.
When your done with your session, just hold the power button to shut off the miVape. I found that the Cups are easy to maintain and keep clean if you brush them out quickly while they are still warm by using the Silicone Safety Cups.
-Vaporization / Vapor Quality

Vaporizing Dry Herbs:
Vaporfections’ miVape is capable of producing some of the tastiest, purest vapor ever out of any portable available but it can also easily char your material and taste really awful if your not careful and don’t experiment around to find out what works best for you. My first session with the miVape was bad, it was way too hot (first version miVape with hot temperature issues BTW) and I had uneven heating with burnt pieces on the bottom and fresh material on the top of the Cup and it tasted awful. After that experience, I realized that the first miVape’s temperatures were off so I lowered it proportionally to Vaporfections instructions, using a temperature conversion chart they provided to get a more accurate temperature and then I started getting better results but I also quickly learned that the miVape needs things a certain way, in order to bring out it’s full potential and I think most people, especially those inexperienced with vaporizers, will find it somewhat disappointing and difficult to get good results out of the box
Even though the miVape features a full range of temperatures at 5°F increments, there is really just a small window that produces the best visible vapor without burning or overheating dry herbs, at least in my experience. The sweet spot for the best taste with the most visible vapor without overheating is between 325°F and 350°F but it varies on personal preference, the  herbs moisture content, amount, grind size etc. Typically, I find the vapor to be the best around 340°F, which is a lower temperature than I use on any of my vapes but even at that temperature, I have experienced especially dark ABV (already been vaped) near the bottom of the Cup, especially if you let the herb sit a while or if you pack in too much, so it doesn’t have room to move around during inhalation. I found that long, slow inhalations work best, the slower and the longer, the better. You don’t want to inhale so hard that all the herb gets sucked up on the top screen and stays there, so you won’t get the full vapor but you don’t want to inhale too lightly, or the herb won’t move around enough and the hot air can’t flow through, which results in overheated herb on the bottom and under heated herb on the top, so there is a fine line in my experience. I also try to inhale frequently, so the herb doesn’t have an opportunity to sit too long on the hot bottom of the Cup, which will eventually over heat the herb and even if you don’t inhale at all during your session, you will find that your herb will still be partly, if not mostly vaporized, thanks to all the extra conduction this unit produces. The miVape needs more and better convection and less conduction!
When the vapor is flowing and the results are good, then the vapor is really great, the flavor is fantastic, the vapor is smooth, cool and pleasant. I’ve experienced some of the best tasting vapor through this device using the smallest amounts of herb, which is quite amazing abd you will be surprised how many clouds the miVape will pull out of a tiny pinch of herb! I have noticed that the flavor can be excellent but it may not always be as full or potent as other vaporizers, like the Crafty or Grasshopper but the flavor lasts longer with the miVape. Those other vaporizers seem give you most of the flavor in the first few inhalations, then tampers off, so it’s give and take, either you get less full flavor for a lot longer or you get the fullest flavor for a short while and that’s one reason why the miVape has a place in my vaporizer line up.
Even when I think I’ve got a good session going and I can’t taste any over heating, sometimes it comes later in the session and then you can tell it’s overheating slightly because the vapor changes, the taste changes and it gets a little “scratchy” on my throat and then I know to turn the unit down or inhale in a different way, otherwise when you pull out that Cup you will see a dark bottom! I found I get great, amazing results with one herb and poor results with another, using the exact same amount, grind size, temperature, inhalation method/duration etc. so I think the vapor quality has a lot to do with the herbs moisture content but I never really know what to expect. If I could repeat good results across the board, then that would be a different story and I could recommend this vaporizer to more people but the consistency isn’t there, at least not for me.
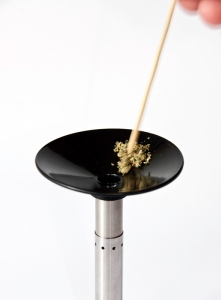
If your getting over heating / uneven heating and don’t want to turn the unit down, you can also try a few things. For instance, try placing something in the bottom of the cup to raise the herb a few mm up and away from the extreme heated Cup bottom, like a screen that’s balled up ( see photo ) or the wax cloths also work and then you can get away with the higher temperatures because your getting more of the convection heat and less of the conduction. Part of the reason why small amounts work better IMO, is that when you inhale the herbs are pulled off the bottom of the Cup and away from the extreme conduction heat so then just the hot air is mostly heating your herb.
 Tip/Tricks: If your experiencing uneven heating or black/charring of the material near the
bottom of the cup, there are a few things to try: First and most importantly, do not overfill the cup. Make sure there is some room near the top of the cup for air and for the herb to move around, no more than 3/4 full of medium to fine grind seems to work best for me. Make sure your
temperature is not too hot, I prefer 325F-350F and sometimes I turn it down when I get a few minutes into the session. Take long, slow, steady inhalations, 8 seconds is a good amount to try and go from there. If your still getting blackness near the bottom of the cup, try pulling the cup/mouthpiece assembly out of the fully locked down position and bring the cup / mouthpiece assembly up a little, just enough so that the area that is normally locked with the silver tab is even/ flush with the silver area where the lock button is locked (See photo). With these tips, I get great results and great taste, even heating and nice visible vapor without black bits.

Vaporizing Concentrates:
Vaporizing concentrates with the miVape is quite amazing on the other hand and it’s easy too. Where the miVape doesn’t always nail it with the dry herbs, it makes up for it in vaporizing concentrates, of all consistencies! I think the miVape does concentrates better than any other portable vaporizer but I think the Haze V3 produces more vapor from concentrate’s but the flavor is better with the miVape. The added conduction and extra hot convection heat on the bottom of the Quartz Cups that can cause charring and uneven heating with herbs, is extremely beneficial when vaping concentrates that need that extra heat for really good vapor production. I have experimented around with oil and waxy consistencies using the wax cloths and it was amazing! Great flavor, great visible vapor and it packed a punch, although I do wish there was a better way for the runnier concentrates than the cloths that require a fresh one each time for best results but overall, I was quite impressed. Drier concentrates are amazing and they can just sit in the bottom of the cup without anything extra where they can bubble away and just a nooky at a time will produce amazing results. You can also mix herb and concentrates together to get some really great results and sometimes it actually helps because the concentrates soak into the herb, preventing them from overheating, so your left with just amazing flavor and great, evenly vaporized ABV. I would be careful with some concentrates that could potentially drip through the holes and i nto the chamber/glass spiral but if you use small amounts and your careful, you shouldn’t have a problem. If nothing more, the miVape is worth buying for concentrates alone!
The only other thing I will mention regarding vaporization and vapor quality, is that the miVape has a somewhat restricted draw. It definitely requires a little lung to inhale but it’s not a deal breaker and it’s not nearly as restricted as some other vaporizers I have owned such as the MiniVap (may have been a faulty unit?) or any Atmos Pen. I have found that some Cups have less resistance than others and sometimes it depends on how you turn the Cup in the track of the mouthpiece assembly or if you have it pushed all the way back into position or not.
Cleaning / Maintenance
 Overall, the miVape body stays perfectly clean as long as you are careful and check the chamber once and a while for any debris that may have fallen through the holes of the Cup. Just a quick dry brush for the chamber is as far as I have ever needed to take it with the body of the miVape.
The Quartz Cups clean up like a breeze with a quick soak in ISO and they will be brand new again and again and you can buy plenty of spares to have on hand, so you’ll never be without a clean Cup and the come in packs of 2 for $15.99 with the Silicone Lid but the Silicone Safety Cups are separate at 2 for $2.99 . If you brush the Cups out while they are still warm, then you won’t need to soak them for quite awhile and they will stay pretty clean.
The mouthpiece assembly, the part that connects the Cup and draw stem is a whole other story, a sad and frustrating tale of misery and confusion. As you have read, this is one of my biggest negatives of the miVape design and I really wish they allowed for users to be able to break down and take this assembly apart for cleaning because it’s damn near impossible to get it all clean. If you soak the mouthpiece assembly in ISO like the user guide shows, you risk having the orange paint wash off and the black plastic turning white-ish. All glass is great for taste but it really doesn’t matter when you can’t fully clean your mouthpiece assembly, so there will likely be a lingering taste added to the pure vapor flavors, so I hope they re-design that piece for easy cleaning.
I recommend soaking the assembly briefly and scrubbing it with pipe cleaners and repeating the process of soaking briefly and scrubbing instead of leaving it in ISO for a long period of time, which is more likely to get it cleaner but also more likely to cause discoloration of the plastic. Soaking is the only possibly chance to get it clean after a while of vaping and you really have to work some pipe cleaners in and around, to try and bend your way into all of the different chambers and crevasses of the assembly and there are a lot of areas that are hard to get to or impossible. Its a bit of a pain but you can get it fairly clean if your patient and persistent.
Pros
- Mostly all glass air and vapor path
- Features convection heat
- Replaceable battery
- Removable chamber: Quartz glass Cups ( great for on the go and you can pre-pack them for convenience )
- Great battery life ( 8-12 sessions, 6 minutes each at 350F )
- Pure, clean taste
- Fantastic with concentrates of all consistencies
- Rotatable draw stem for comfortable vaping
- Very small and portable
- Can be very efficient: works best with small amount of material
- Great customer service from Vaporfection
- Wide range of temperatures with custom shut-off timer
- Fast heat up
Cons
 #1 negative: Convection heating system combined with secondary conduction heat can cause inconsistent results, overheating, uneven heating, charring and burning at times.
- #2 negative: Cheap-ish feel, all plastic construction, painted pieces
- #3 Major negative: Very difficult / near impossible to clean the mouthpiece assembly entirely
- Somewhat restricted draw
- Herb cups only support small amount of materials
- Relatively long charge times. Tends to get stuck on 80-90%
- Cannot be used while charging
Conclusion
 Overall, I love the design and idea behind the miVape: A portable vaporizer with glass components, combined with pure convection heat, features a replaceable battery along with the ability to vaporize both dry materials and concentrates. It sounds like a dream vaporizer and it has those features and vaporizes dry materials and concentrates. However, the miVape doesn’t quite fully live up to the dream with inconsistent results, uneven heating and a disappointing build quality that feels like a toy. The miVape is a diamond in the rough and it just needs to be polished and refined to really shine!
Even though there is room for improvement, the potential is there, the idea is there, it just needs some upgrades. The miVape has a place in my vape collection and I do pull it out once and awhile when I’m in the mood for concentrates or just want to taste a pinch of herb but it just doesn’t have the chops, yet, to keep it on the top shelf. I hope Vaporfection will work on the miVape, give it some love and release the miVape 2 that takes advantage of what glass can truly offer. I would not recommend this vaporizer to everyone, just those who have some experience with vaporizers and who like to fool around to get the results its capable of, otherwise I think most people may find it too difficult and particular to get great vapor by just tossing in some herb.
#1: Improve or re-design the glass heating system so it features more convection heat and less conduction.
#2: Build it better with higher quality materials, maybe use some metal.
#3: Update that mouthpiece! Please, we need to be able to clean this piece! Glass anyone?
If they change all or any of those issues, then the miVape could become a dream vape!


 t often but the GH is ridiculous when combined with one and when their forces combine, monster clouds are the result! I was hoping to see a universal Water Pipe adapter that fits 14mm and 18mm in one but this keeps the adapter small, compact and sleek. Look for these on the GH website in the next coming months.


 Titanium version! If you choose Titanium, you can also have it anodized for $5.00 more with your choice of color; Dark Grey, Bronze, Green, Purple and Blue. The Titanium version is more durable, has better scratch resistance, lighter weight by over 10 grams and it has better thermal properties that allow it to cool down faster. For this review, I used both versions, a Stainless Steel model and a plain Titanium. The devices have the exact same chamber, electronics, heater, battery etc. and the main difference lies in the outside shell or body of the device. You can expect the same results, taste and vapor, battery life etc. from both devices but overall, I have found that the Titanium version’s body heats up quicker than the Stainless Steel but it cools down faster than the S.S. The machining is slightly different between the two metals and I prefer the feel, machine quality and performance of my S.S. GH over my Ti GH, just ever so slightly. They are so close but subtle differences can make a difference and the Ti is noticeably lighter, and tends to pick up far less scratches and dings, so I tend to take that model with me more often than the S.S. for those reasons. Performance is basically the same, so it comes down to personal preference and cost, the Ti GH is $50.00 more than the S.S.
 The Grasshopper Leather Sleeve protect your vape and it keep the air inlet holes free and clear during transportation without any worries. I highly recommend the leather sleeves, they do a great job protecting your vape and at only $10.00, they are well worth it. I would like to see a full length leather sleeve that covers the entire GH, including the power button for added protection but Hopper Labs will be releasing a metal case that will hold your GH suspended inside an airtight tube with a storage space for herbs or whatever. I will update this post as soon as I get my hands on the case!

 The temperature dial is located on the top, along with the on/off button. There are 5 “tick” marks on the dial, starting with mark 1 at 266°F to mark 5 at 410°F with 28.8°F increments and you can stop anywhere in between the marks, which allows users to fine tune their temperature. The temperature marks and the + / – signs are engraved into the metal, so there is no worry of them rubbing off and they are very clean, crisp and easy to read. The dial turns smoothly and with a good amount of resistance so it will stay where you set it.

 The mouthpiece screws directly on to the end of the heating chamber with just a few turns and the threading is very minimal, so it comes off and on with ease. Inside either the Ti or S.S. GH, the parts are the same and the vapor path is also the same, except for maybe a mm at the very tip, where it passes directly over the metal of the mouthpiece. You can expect the same flavor from both versions but the mouthpiece will heat / cool at different rates, depending on what metal you chose. From what I’ve noticed, the S.S. GH mouthpiece warms up slower overall but it seems to take longer to cool. The Ti mouthpiece seems to warm up faster but seems to cool down quicker. Again, I tend to prefer the S.S. GH slightly over the Ti, it just feels better to me and I like that it takes a little longer to warm up and if I wait a minute or so between inhalations, it really doesn’t get hardly warm at all.
 The Grasshopper uses a replaceable battery, a feature that EVERY portable vaporizer should have! That’s kind of the main purpose behind a portable vaporizer, to be able to bring it with you, so being able to bring spare batteries and replace them, can greatly increase your vape time on the go. At $7.00 each, it’s easy to pick up a few extras for just such an occasion, that way you always have a charged battery ready to go.
 battery life really is. This was one of my main concerns before trying the Grasshopper and I feared a repeat of the Thermovape T1 situation, where you needed to replace the batteries after every load basically, thankfully that is not the case with the Grasshopper. On average I have been able to get about 20-30, 5-8 seconds inhalations on temperature 2-5-3.5 on the dial, which has been equivalent to about 3-5 full chamber loads using the on/off method. In my experience this is usually more than enough for a full day of vaping on the go and if it’s not, you have the option to bring spare batteries.


 r offers a unique style of vaping that is different than most other portable vaporizers out today and this in part, is due to it’s insanely fast heat up time. With the Grasshopper’s “heat on demand,” your only seconds away from tasty, potent, satisfying vapor, which allows you vape at your own speed. Some vaporizer similar to the GH’s unique style and heat include: the Firefly, Elevape SV, Thermovape, and The Magic Flight Launch Box to name a few.
 battery life and for safety reasons. This shut-off feature can be reset with your inhalation, as the Grasshopper will sense this and cancel the shut-off, therefore staying on for another 18 seconds or until you inhale again. This is a good feature for people who like to keep the Grasshopper on, instead of clicking it on/off each inhalation and it is nice in case you forget about it or it somehow turns on when your carrying it.
 vaporize an entire chamber with just a few draws on the higher temperatures if you want, or you can take it nice and slow, with a lower temperature for better flavor and a smoother draw. This vaporizer is incredibly efficient and I tend to use a lot less material and often require less inhalations to achieve the same effect. You can essentially put just a pinch of herb in the chamber and effectively use the Grasshopper as a “one hitter” and replace the herb every hit or two so you always have fresh, clean tasting vapor and it really allows you to conserve your herb and cut back on usage. The Grasshopper will work just as well if you fill it up too but don’t over pack it or pack the chamber too tight, preventing the hot air from freely flowing through the material, effectively and evenly vaporizing your herbs active ingredients. Vaporizers that use Conduction heat on the other hand, require the opposite and it’s better to fill the chambers full and packed tighter, as they vaporize by direct contact with the heat source, essentially “baking” the material.
 especially on the lower temperatures. The vapor is not always as cool as the Crafty or Mighty but the vapor just as great, even better at times, especially the first few inhalations. The very short vapor path of the GH provides intense flavor, minimizes build-up and means you won’t be missing any of the active ingredients. Longer vapor paths can be great for cooler, smoother vapor but they can collect vapor that has cooled, making the flavor less pure but the GH tastes pure all the time, unless the it’s in need of deep cleaning. With the Crafty or Mighty, their Cooling Tops allow much more room for the vapor to expand and cool than the GH, allowing you to take longer and larger hits but on the flip side the vapor may taste less pure in the long run and requires more time to clean.
 great, pure and satisfying but I have noticed that the flavor seems to drop off faster than other vaporizers on the mid-high temperatures, which I think is due to the awesome extraction/efficiency of the heat exhanger, as well as the small surface area in the herb chamber. With that said, I have found that the vapor tastes great, every hit on the lower temperatures but there is less visible vapor and with the mid to high temperatures, the vapor always tastes great on the first few hits but the flavor and smoothness fades a little as the unit gets hotter but this is true for all vaporizers. I have inhaled with the GH with nothing in the chamber and the heat is pure and basically tasteless, so yo taste only the material your vaping.


 This is a preview and Introduction to the already famous and mysterious, Grasshopper Vaporizer from Hopper Labs of Boulder, CO.
 n, from the great mechanical on / off button to the threading that creates a near seamless unit. The Grasshopper is very well machined, it feels good in your hand and it’s solid like a rock. The only other vape that I can compare it’s construction to, would be the Elevape SV, which is also nearly all metal but the Grasshopper is much more powerful and it comes with a lifetime warranty and when you feel it, you will agree that it will last a lifetime. The solid construction, simple design and high quality materials make the Grasshopper ideal for on the go use without having worry about damaging the unit and it’s small size will make you forget that you are carrying it.
 instantaneous and it’s one of the many, innovative features that sets the Grasshopper apart from any other vaporizer on the market. The Grasshopper heats on demand, around 5 seconds is all, and your good to go. The Firefly, Elevape SV also offer a similar “heat on demand,” but the Grasshopper is far more portable and in my opinion and it does a better job extracting the active ingredients in your material with a fewer amount of inhalations.
 he Grasshopper, fill the chamber with your herb, set your temperature on the dial, click it like you would a regular pen to turn it on/off and get ready, it’s that simple! My preferred method of use is to click it on, take a puff and click it off. I got great results with this method and there’s no need to rush to finish your load because it doesn’t need to stay on, just click it on when you need and its heated almost instantly. This method also keeps the unit from getting too hot but if it does get hot, wait a few seconds and it will cool back down. When you click it on, a red LED light illuminates, letting you know that the unit is heating up and it turns blue when it’s ready to use. I have found that the LED can be difficult to see in the sunlight but you really don’t need to see the LED, just wait a few seconds after you have clicked it on and inhale. The LED will flash red when the battery gets low, indicating you need to charge the battery and you don’t need to worry about leaving
 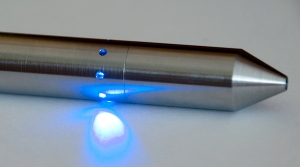 it one because it has an 18 second auto shut off. If you continue to puff, the Grasshopper senses when you inhale and it will cancel the auto shut off, so the unit will continue to heat for about another 18 seconds and you can keep inhaling every so often to keep re-setting the shut off timer, allowing the unit to stay on. Do to the nearly all metal construction, the Grasshopper does get hot but it cools off fast and from what I understand the Titanium version cools down even faster! I found that it’s perfectly fine and comfortable with the click on, puff, click off method so it doesn’t get too hot and I have also noticed that it’s cooler on your lips if you use the mout
 hpiece further up, rather than the very tip, which gets hotter faster. If you want a little more action or you feel like sharing, Hopper Labs has a silicone mouth guard that fits snugly over the metal mouthpiece for a much cooler experience especially on the higher temps or if you like to leave it on, instead of clicking it on/off each inhalation. This silicone mouth guard/piece will also allow users to use bubbler’s and bongs with the Grasshopper because it will create a good seal on your glass joints.
 pinch at a time, it doesn’t matter, the results are the same, it evenly and effectively vaporizes your favorite blend every time without the need to stir, thanks to the convection heat. The Grasshopper also works well with different grinds from fine to courser, larger pieces of herb but for the absolute best extraction, it’s always best to grind your herb to increase the surface area, allowing the heat to easily boil the active ingredients of your herb, releasing their vapors. The chamber holds approximately 1.2cc of herb and its about 8.5 mm in diameter and about 19 mm deep. The heating chamber is stainless steel with a screen in the bottom and the chamber’s easy access makes loading and unloading the Grasshopper a breeze. I usually brush the chamber out after every load to reduce the build up of residues and it keeps you from having to “deep” clean the chamber almost entirely. Some herb dust sticks to the walls of the chamber but is easily brushed out and nothing seems to stick to the chamber screen which may be anodized and thus is more “non stick”.
 all but it’s 3d printed heater puts out a lot of heat, enough to kill a chamber in a few puffs if you choose to or you can set the temperature a little lower and take it easy and puff away. It utilizes a 30 watt heater that can fluctuate up to 45 watts, depending on your setting and draw. To put that into perspective, the famous and powerful Storz and Bickel Mighty vaporizer puts out 30 watts of heat which is enormous in size compared to the Grasshoppers pen size.
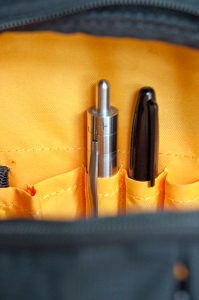 inhalations and the Grasshopper seems to give you more active ingredients per hit, thanks to that powerful heater so you don’t need to take long inhalations like other vaporizers to get a satisfying hit. I would say the vapor feels similar to the Inhalater vaporizer but it tastes better in my opinion. The first hit on the Grasshopper is the coolest, smoothest and the most flavorful. After the first few hits, the unit gets warmer to the touch and the vapor gets a little hotter, less smooth and the flavor diminishes but this is true for any vaporizer. I have inhaled with this vaporizer when there was nothing in the chamber to see if I could detect any off taste and as far as I could tell, it tasted fine and pure, less a very slight, metallic hint. This vaporizer could appeal to people who prefer combustion as it feels more similar to the smoking method than other portable vapes I have used, partly do to the stronger, denser and shorter drags and instantaneous heat. The Grasshopper offers a different style of vaping because the heater isn’t always on, only when you need it, (heat on demand) so you don’t have to finish the whole chamber if you don’t want to. I also found that this is a great vape to medicate with because its quick, convenient and packs a punch. Other “session” style vaporizers like the Crafty or Davinci, take a while to get up to temperature and once that temperature has been
  reached, then you tend to rush and finish the load because it’s maintaining that high temperature constantly which takes a lot of energy, draining your battery and always heating your material. With the Grasshopper you can take as long as you want between draws and a tasty, potent and satisfying hit is never more than 5 seconds away. I prefer heat on demand vaporizers like the Grasshopper and the Firefly for portable vapes because it makes more sense to use it only when you need it instead of all at once.
 production version, I was able to get a good 20-30, 8-10 second puffs, per battery, on level 3-4 on the temperature dial, equivalent to about 4 chamber loads using these settings and method. I usually get another hit after its off but still hot and cooling down if your fast enough or you can leave it on and keep hitting
 along and be good for a long time. When it comes to charging the Grasshopper, it doesn’t get any easier. The sleek charger magnetically connects to the on/off button and it makes a secure connection so your free to move around and use it while its charging.
 maintenance is pretty straight forward and you just need to soak the mouth piece in Isopropyl alcohol (IPA) and swab the chamber with a q-tip soaked in IPA and that’s basically it. The screens in the mouthpiece are replaceable but they will likely not need to be changed as they are very durable and sturdy. Hopper Labs is considering to release a tool that will make screen removal easy. The Leather Sleeves retail for $10.00 each and I recommend getting one to carry and protect your Grasshopper. They fit very well and it also keeps lint, dust and particles from entering the air intake holes which you could potentially breath in.
 pression of the Grasshopper was amazing! The Grasshopper is the total package, with a great design and high quality construction, produces tasty, pure and potent vapor, all neatly wrapped up in a sleek and stealthy, ultra-portable pen that is built to last a lifetime. If your looking for a reliable dry herb vaporizer that you can take everywhere, the Grasshopper is your vape! Nothing is more powerful, this compact, or durable that provides instant satisfaction and features that other portable vapes don’t have at prices 3x as much. Please check back soon for my FULL PRODUCTION GRASHOPPER REVIEW! I will be updating this post periodically with new information as my testing continues along with more photos as and information from Hopper Labs as it is released . Thank you for reading and please contact me with any questions or comments. Please use the contact form below.


 one of the smallest vaporizers I have tried. I am impressed with the build quality of this device and it feels really good in your hand, nothing rattles or feels flimsy. The outside of the device is made from a solid piece of aluminum or steel that makes up the devices shell, which holds and protects everything inside. The shell of the Alfa must be aluminum and it’s well finished, painted nicely and the rounded edges make for a comfortable grip and in your pocket too. I have noticed that one little screw above the charging port, appears to hold the entire insides to the shell, so when I am closing the chamber door, I can move the insides a bit with the force to latch the door. I think it’s plenty sturdy but I wish there was more holding everything inside.
 The Alfa’s oven or chamber is located at the bottom of the unit, which is accessed by a door that swings open on a hinge and locks with a sliding latch. Slide the latch and swing open the door open to reveal the silver-colored, anodized chamber, featuring a center heating pin. The chamber is a good size and can hold quite a lot of material given how small the actual device is and it’s unique design allows you to get away with filling it completely or just using a smaller amount thanks to that center heating pin. Loading and unloading the chamber is a little awkward at first because the door is slightly in the way and it likes to flop over if you’re not careful. A spring would be a great addition to the chamber door and it would keep it open during loading and unloading.
 r.
r. he Alfa has a great design and I really like how simple everything is, including the vapor path and mouthpiece. Basically, the vapor path is a straight shot from chamber to mouthpiece, which is connected by a Stainless Steel tube. This seals off the vapor from all the electronics and battery inside, so no funny business. This also makes cleaning easy and effortless, just run one of the included pipe cleaners in and out a few times with a little ISO and it’s good to go. The early versions had a mouthpiece screen only, so particles would sometimes find themselves up and around the mouthpiece which made things a little dirtier and messier than the new chamber screens. The new chamber screens do a great job keeping the vapor path clean and clear.


 as the battery level drops, the heat up time increases and nearing a drained battery, it can take over a minute to reach MID temp. The Alfa does get warm after a while on the MID setting, which is inevitable with a vaporizer this small but it never gets hot or uncomfortable to hold. A Silicone sleeve that could slip over the body of the Alfa or the chamber area would be a nice accessory to keep the unit cooler, especially during extended sessions.
